深度学习 – 语音识别框架Wenet网络设计与实现
转载自Wenet网络设计与实现,这个文章是Wenet团队对Wenet比较全面的介绍,也在很多地方解答了我在看wenet源码时的疑惑,会时不时翻出来再看的文章,但是这个文章是托管在Github上的,所以为了防止某些不可控的原因导致无法阅读原文,所以在本站对原文进行完整备份,仅用于个人阅读,如果原作者认为是侵权,请联系我删除。
如果觉得wenet还不错,点个star支持我们一下吧
https://github.com/wenet-e2e/wenet
本文分为四部分
- 端到端语音识别基础
- pytorch的实现介绍
- 进阶内容:mask
- 进阶内容:cache
第1节: 端到端语音识别基础
语音识别任务中,输入是语音,输出是文本,其特点在于两个序列不等长,但在时序上有同步性。传统语音识别通过HMM来建模输出和输入不等长和时序同步性,并对音素,词典,语言模型分层次建模。
在传统的HMM框架里,声学模型往往在三音素的hmm状态级别建模,与语言模型分开建模训练,在训练时,任务的整体目标会被割裂成多个训练目标。 另外,传统的HMM框架框架的模型训练会涉及到很多过程,包括上下文相关音素,音素聚类,HMM-GMM训练,强制对齐等,非常繁琐。因此,传统的HMM框架在性能和易用性上都存在不足。
下面是一个HMM-DNN模型的训练过程,仅用于说明训练过程的复杂,具体内容可以不看。
1.对于每个句子扩展为单音素序列,用前向后向EM训练,得到单因素的hmm-单高斯model1。
2.用model1对句子做对齐,单高斯进行2倍分裂,更新模型,迭代这个对齐/分裂的过程n次,得到单因素的hmm-gmm模型model2.
3.用model2对句子做对齐,将音素根据上下文扩展为三音素,使用单高斯学习每个音素的决策树,,最后每个叶子结点对应一个单高斯. 得到一个三音素-hmm-单高斯模型model3
4.类似于第2步,用model3不停迭代分裂高斯,得到三音素hmm-gmm的model4
5. model4对句子做对齐,对齐数据用于帧级别NN训练.
一般在传统HMM框架下,会先利用HMM-GMM模型,通过对齐的方式,得到帧级别的对应标注,再通过帧级别损失函数来优化神经网络模型, 不过这也不是必须的,HMM框架也可以不做帧对齐,比如论文End-to-end speech recognition using lattice-free MMI中直接进行训练。
近几年,基于神经网络的端到端建模方式则更佳简洁
- 直接以目标单元作为建模对象,比如中文使用字,英文使用字符或者BPE.
- 通过特殊的模型(目标函数),处理输入输出对齐未知的问题。
这类端到端模型常用的建模方式分两类: 基于CTC目标函数和基于Attention-Encoder-Decoder结构的模型。在这两种框架下,可以选用各种不同的类型神经网络。比如DNN,RNN,CNN,Self-Attention。
CTC目标函数
传统语音识别通过HMM来约束输出和输入的对齐方式(时间上保持单调),CTC其实也是一种特殊的HMM约束,可以处理输入输出间的不等长和时序同步约束。
CTC本质上对所有合法的输出和输入对齐方式进行了穷举,所谓合法,即对齐后的输出序列能够按CTC规则规约得到的原标注序列,则为合法对齐。
使用CTC目标函数会引入一个blank的输出单元,CTC规约规则为:
- 连续的相同字符进行合并
- 移除blank字符
一个例子:
某段语音数据,输入帧数为7帧(此处仅用于举例),原始的标注序列为“出门问问”,是4个字,但是网络的输出和输入一一对应,因此需要输出7个单元。CTC模型中,通过对原标注内的4个单元进行重复和插入blank来扩展为7个单元,下面两种都是可能的扩展序列,其中-为blank,如果扩展序列通过CTC规则规约可以得到原标注序列,则此扩展序列称为合法对齐序列。
出-门问问-问 -> 出门问问
出-门--问问 -> 出门问
第一个对齐序列出-门问问-问是合法对齐序列,第二个对齐序列出-门--问问不是合法对齐序列。
除了出-门问问-问还有很多其他合法序列,比如
出出门问问-问
出出出门问-问
出-门-问-问
出--门问-问
...
CTC目标函数的思想是: 既然不知道哪种对齐关系是正确的,那就最大化所有合法CTC对齐的概率之和。所以对于这个样本,目标就是最大化如下概率。
P(出门问问|X) = P(出-门问问-问|X) + P(出出门问问-问|X)
+ P(出出出门问-问|X)+ ... + P(出--门问-问|X)
求这个目标函数梯度的一种方式是穷举所有的有效CTC对齐,分别求梯度相加。但是这种方法复杂度太高。由于CTC本身结构特点,存在一种更高效的动态规划算法,可以极大的提升速度。具体可参考论文CTC-paper和文章Eesen中的CTC实现。
解码时,模型对每一个输入帧都给出输出,这种解码方法称为Frame同步解码。若某些帧输出为blank或者和前一帧是重复的字符,则可以合并。
由于在训练时,穷举的所有CTC扩展序列中blank占的个数最多,因此模型会倾向于学习到去输出尽量多的blank字符,也就是尽可能少的非blank字符,从而解码序列中往往每个非blank字符只输出一次,这个叫做CTC的尖峰效应。
学习CTC的优秀材料:
Attention-based Encoder Decoder
Attention-based Encoder Decoder简称AED,也叫Seq2Seq框架,在ASR领域里,该框架也叫做LAS(Listen, Attend and Spell)。
模型中的encoder对输入序列(语音)进行信息提取,decoder则是一个在目标序列(文本)上的自回归模型(输入之前的单元,预测下一个单元),同时在自回归计算时,通过attention方式去获取encoder的输出编码信息,从而能够利用到输入序列的信息。
这种建模方式,可以不必显示建模输出和输入之间的对齐关系,而是利用attention机制交给网络去学习出隐含的对齐。相比如CTC,AED允许输入输出单元之间存在时序上的交换,因此特别适用于机器翻译这种任务。但是对于语音识别或者语音合成这些存在时序单调性的任务,这种无约束反而会带来一些问题。
AED的解码
解码时,不需要对每一个输入帧都进行输出,而是根据整个输入序列信息和已输出信息进行下一次输出,直到输出一个特殊结束字符。 这种解码方法称为Label同步解码。
多说一句
CTC没有显示构建文本之间的关系,RNN-t模型是一种显示建模了文本关系的帧同步解码的模型。
标准的AED中,decoder和encoder之间cross-attention需要看到encoder的完整序列,所以无法进行流式识别。可利用GMM-attention/Mocha/MMA等单调递进的局部Attention方法进行改进。
联合建模
研究者发现,联合使用CTC loss和AED可以有效的加速训练收敛,同时得到更好的识别结果。目前这个方法已经成为端到端学习的标准方案。
在解码时,同时使用CTC和AED的输出,可以提高识别率,但是由于AED本身是非流式的解码,在Wenet中,则没采用联合解码的方式,而是采用了先使用CTC解码,再用AED对CTC的Nbest结果进行Rescoring,这样即结合了两种模型的效果,又可以应用于流式场景。
神经网络类型
常用的神经网络类型包括DNN,CNN,RNN,Self-attention等,这些方法进行组合,衍生出了各种模型,Wenet中,对于encoder网络部分,支持Transformer和Conformer两种网络。decoder网络部分,支持Transformer网络。
Transformer由多个Transformer Block堆叠,每个Block中会使用self-attention,res,relu,ff层。
Conformer由多个Conformer Block堆叠,每个Block中会使用conv,self-attention,res,relu,ff层。
降采样/降帧率
输入序列越长,即帧的个数越多,网络计算量就越大。而在语音识别中,一定时间范围内的语音信号是相似的,多个连续帧对应的是同一个发音,另外,端到端语音识别使用建模单元一般是一个时间延续较长的单元(粗粒度),比如建模单元是一个中文汉字,假如一个汉字用时0.2s,0.2s对应20帧,如果将20帧的信息进行合并,比如合并为5帧,在进行帧同步输出时不会出现丢字问题,同时还可以线性的减少后续encoder网络的前向计算、CTC loss和AED计算cross attention时的开销。
可以用不同的神经网络来进行降采样,Wenet中使用的是2D-CNN。
流式语音识别
虽然CTC解码是Frame同步的,但若需要支持低延迟的流式识别,Encoder中的计算对右侧的依赖不能太长。标准的Fully self-attention会依赖整个序列,不能进行流式计算,因此wenet采用了基于chunk的attention,将序列划分为多个固定大小的chunk,每个chunk内部的帧不会依赖于chunk右侧的帧。
另一方面,连续堆叠的convolution层会带来较大的右侧依赖,wenet则采用了因果卷积来避免convolution层的右侧依赖。
第2节: Wenet中的神经网络设计与实现
前文介绍了端到端神经网络的基本知识,本文介绍Wenet中的设计与实现。
Wenet的代码借鉴了Espnet等开源项目,由于完全专注于语音识别和工业方案,代码非常简洁,但是为了实现基于chunk的流式解码,以及处理batch内不等长序列,仍然包含的一些实现技巧,比如cache和mask,这使得一些代码在初次阅读时不易理解,可在第一步学习代码时略过相关内容。
核心模型的代码位于wenet/transformer/目录
模型入口 ASRModel
wenet/transformer/asr_model.py
模型定义
使用pytorch Module构建神经网络时,在init中定义用到的子模块
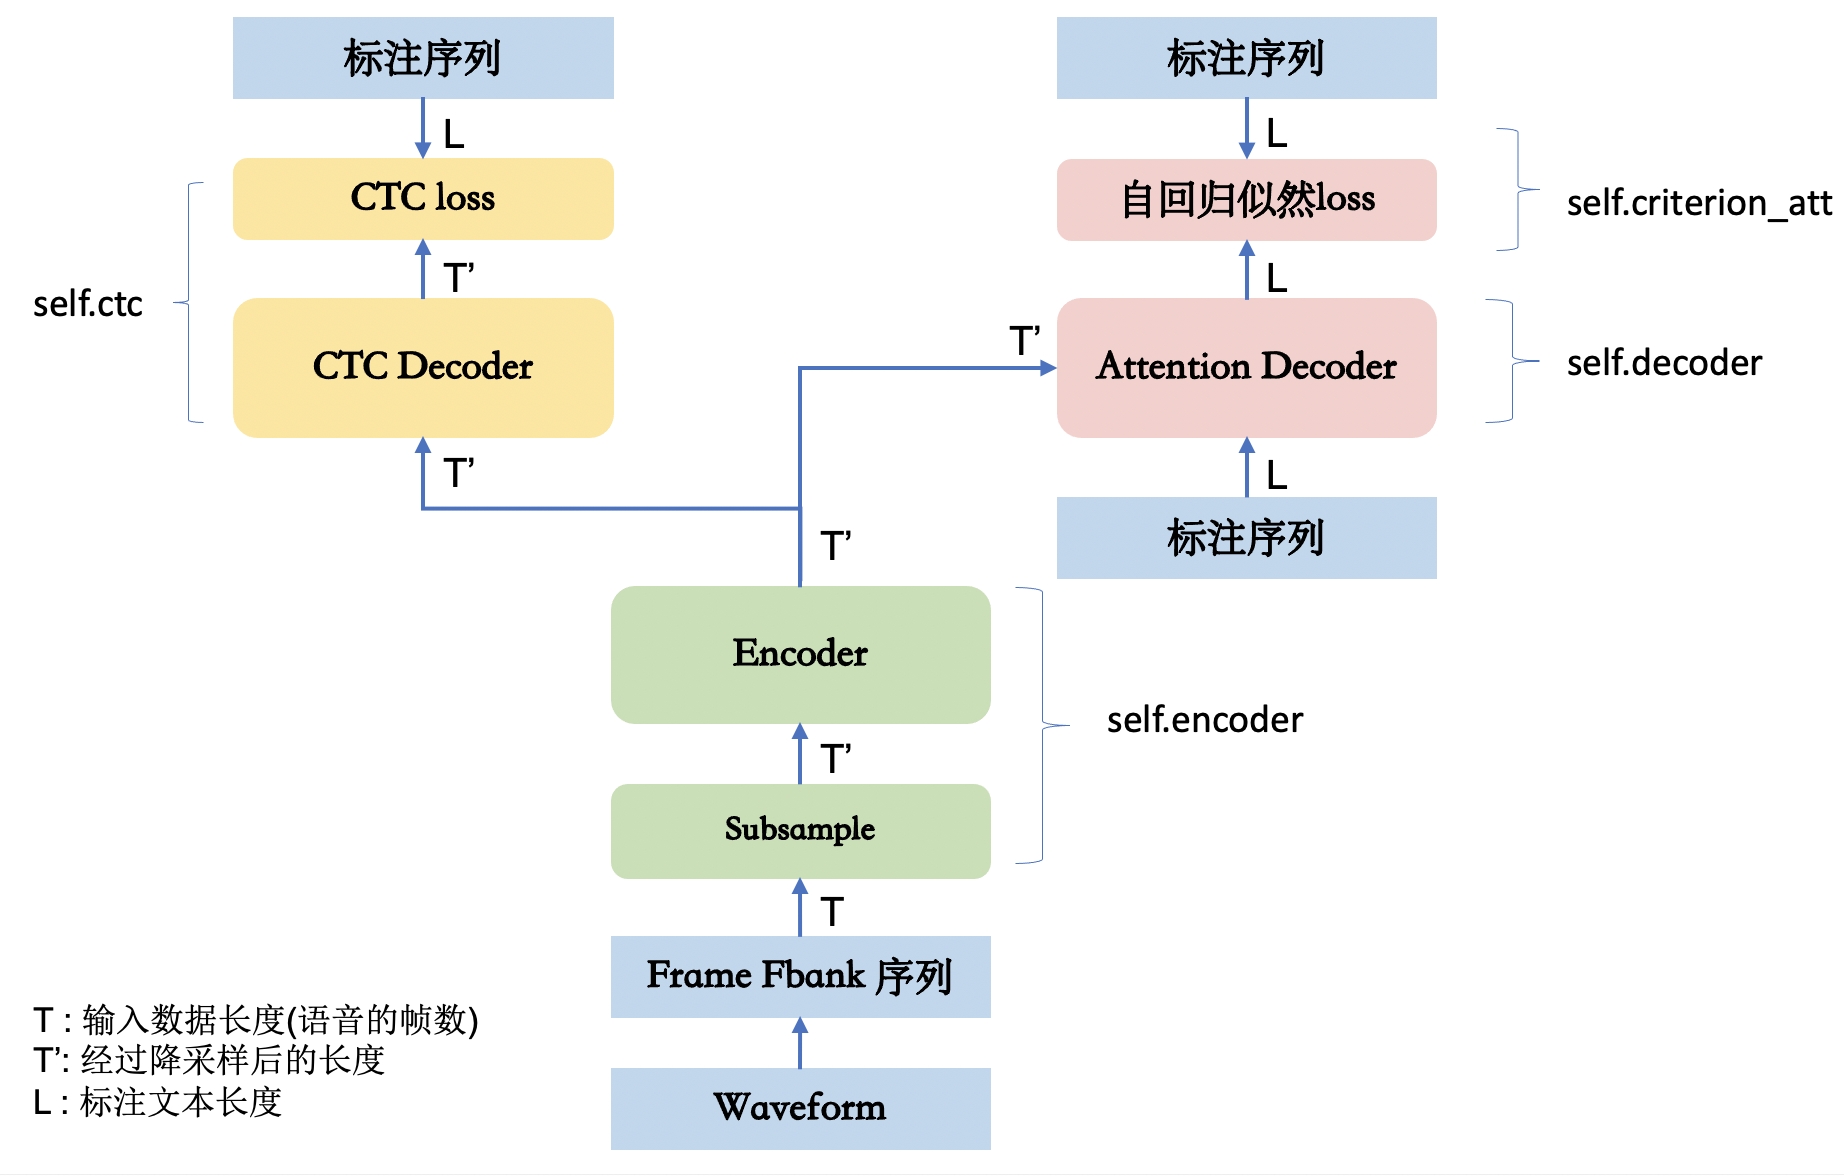
class ASRModel(torch.nn.Module)
def __init__():
    self.encoder = encoder
    self.decoder = decoder
    self.ctc = ctc
    self.criterion_att = LabelSmoothingLoss(...)# AED的loss
ASRModel的init中定义了encoder, decoder, ctc, criterion_att几个基本模块。其整体网络拓扑如下图所示。
- encoder是Shared Encoder,其中也包括了Subsample网络。
- decoder是Attention-based Decoder网络
- ctc是ctc Decoder网络(该decoder结构很简单,仅仅是前向网络和softmax)和ctc loss
- criterion_att是Attention-based Decoder对应的自回归似然loss,实际是一个LabelSmoothing的loss。
ASRModel中的模块又有自己的子模块,可以通过print打印出完整的模型结构。
model = ASRModel(...)
print(model)
创建模型
def init_asr_model(config):
该方法根据传入的config,创建一个ASRModel实例。 config内容由训练模型时使用的yaml文件提供。这个创建仅仅是构建了一个初始模型,其参数是随机的,可以通过 model.load_state_dict(checkpoint)从训练好的模型中加载参数。
前向计算
pytorch框架下,只需定义模型的前向计算forword,。对于每个Module,可以通过阅读forward代码来学习其具体实现。
class ASRModel(torch.nn.Module):
  def forward()
    ...
    # Encoder
    encoder_out, encoder_mask = self.encoder(speech, speech_lengths)
    encoder_out_lens = encoder_mask.squeeze(1).sum(1)

    # Attention-decoder
    loss_att, acc_att = self._calc_att_loss(encoder_out, encoder_mask,
                                              text, text_lengths)
    # CTC
    loss_ctc = self.ctc(encoder_out, encoder_out_lens, text,text_lengths)
    loss = self.ctc_weight * loss_ctc + (1 -self.ctc_weight) * loss_att
    ...
其他接口
ASRModel除了定义模型结构和实现前向计算用于训练外,还有两个功能:
- 提供多种python的解码接口
- 提供runtime中需要使用的接口
python解码接口
recognize() # attention decoder
attention_rescoring() # CTC + attention rescoring
ctc_prefix_beam_search() # CTC prefix beamsearch
ctc_greedy_search() # CTC greedy search
用于Runtime的接口, 这些接口均有@torch.jit.export注解,可以在C++中调用
subsampling_rate()
right_context()
sos_symbol()
eos_symbol()
forward_encoder_chunk()
forward_attention_decoder()
ctc_activation()
其中比较重要的是
forward_attention_decoder()Attention Decoder的序列forward计算,非自回归模式ctc_activation()CTC Decoder forward计算forward_encoder_chunk()基于chunk的Encoder forward计算
初学者可以先仅关注训练时使用的forward()函数。
Encoder网络
wenet/transformer/encoder.py
Wenet的encoder支持Transformer和Conformer两种网络结构,实现时使用了模版方法的设计模式进代码复用。BaseEncoder中定义了如下统一的前向过程,由TransformerEncoder,ConformerEncoder继承BaseEncoder后分别定义各自的self.encoders的结构。
class BaseEncoder(torch.nn.Module):
  def forward(...):
      xs, pos_emb, masks = self.embed(xs, masks)
      chunk_masks = add_optional_chunk_mask(xs, ..)
      for layer in self.encoders:
          xs, chunk_masks, _ = layer(xs, chunk_masks, pos_emb, mask_pad)
      if self.normalize_before:
          xs = self.after_norm(xs)
可以看到Encoder分为两大部分
- self.embed是Subsampling网络
- self.encoders是一组相同结构网络(Encoder Blocks)的堆叠
除了forward,Encoder还实现了两个方法,此处不展开介绍。
forward_chunk_by_chunk,python解码时,模拟流式解码模式基于chunk的前向计算。forward_chunk, 单次基于chunk的前向计算,通过ASRModel导出为forward_encoder_chunk()供runtime解码使用。
下面先介绍Subsampling部分,再介绍Encoder Block
Subsampling网络
wenet/transformer/subsampling.py
前文已经介绍了降采样或者降帧率的目的。这里不再重述。
语音任务里有两种使用CNN的方式,一种是2D-Conv,一种是1D-Conv:
- 2D-Conv: 输入数据看作是深度(通道数)为1,高度为F(Fbank特征维度,idim),宽度为T(帧数)的一张图.
- 1D-Conv: 输入数据看作是深度(通道数)为F(Fbank特征维度),高度为1,宽度为T(帧数)的一张图.
Kaldi中著名的TDNN就是是1D-Conv,在Wenet中采用2D-Conv来实现降采样。
Wenet中提供了多个降采样的网络,这里选择把帧率降低4倍的网络Conv2dSubsampling4来说明。
class Conv2dSubsampling4(BaseSubsampling):
    def __init__(self, idim: int, odim: int, dropout_rate: float,
                 pos_enc_class: torch.nn.Module):
        """Construct an Conv2dSubsampling4 object."""
        super().__init__()
        self.conv = torch.nn.Sequential(
            torch.nn.Conv2d(1, odim, 3, 2),
            torch.nn.ReLU(),
            torch.nn.Conv2d(odim, odim, 3, 2),
            torch.nn.ReLU(),
        )
        self.out = torch.nn.Linear(odim * (((idim - 1) // 2 - 1) // 2), odim)
        self.pos_enc = pos_enc_class
        # The right context for every conv layer is computed by:
        # (kernel_size - 1) / 2 * stride  * frame_rate_of_this_layer
        self.subsampling_rate = 4
        # 6 = (3 - 1) / 2 * 2 * 1 + (3 - 1) / 2 * 2 * 2
        self.right_context = 6
我们可以把一个语音帧序列[T,D]看作宽是T,高是D,深度为1的图像。Conv2dSubsampling4通过两个stride=2的2d-CNN,把图像的宽和高都降为1/4. 因为图像的宽即是帧数,所以帧数变为1/4.
torch.nn.Conv2d(1, odim, kernel_size=3, stride=2)
torch.nn.Conv2d(odim, odim, kernel_size=3, stride=2)
具体的实现过程
def forward(...):
    x = x.unsqueeze(1)  # (b, c=1, t, f)
    x = self.conv(x)
    b, c, t, f = x.size()
    x = self.out(x.transpose(1, 2).contiguous().view(b, t, c * f))
    x, pos_emb = self.pos_enc(x, offset)
    return x, pos_emb, x_mask[:, :, :-2:2][:, :, :-2:2]
- x = x.unsqueeze(1) # (b, c=1, t, f) 增加channel维,以符合2dConv需要的数据格式。
- conv(x)中进行两次卷积,此时t维度约等于原来的1/4,因为没加padding,实际上是从长度T变为长度((T-1)/2-1)/2)。注意经过卷积后深度不再是1。
- view(b, t, c * f) 将深度和高度合并平铺到同一维,然后通过self.out()对每帧做Affine变换
- pos_enc(x, offset) 经过subsampling之后,帧数变少了,此时再计算Positional Eembedding。
在纯self-attention层构建的网络里,为了保证序列的顺序不可变性而引入了PE,从而交换序列中的两帧,输出会不同。但是由于subsampling的存在,序列本身已经失去了交换不变性,所以其实PE可以省去。
x_mask是原始帧率下的记录batch各序列长度的mask,在计算attention以及ctc loss时均要使用,现在帧数降低了,x_mask也要跟着变化。
返回独立的pos_emb,是因为在relative position attention中,需要获取relative pos_emb的信息。在标准attention中该返回值不会被用到。
上下文依赖
注意Conv2dSubsampling4中的这两个变量。
self.subsampling_rate = 4
self.right_context = 6
这两个变量都在asr_model中进行了导出,在runtime时被使用,他们的含义是什么?
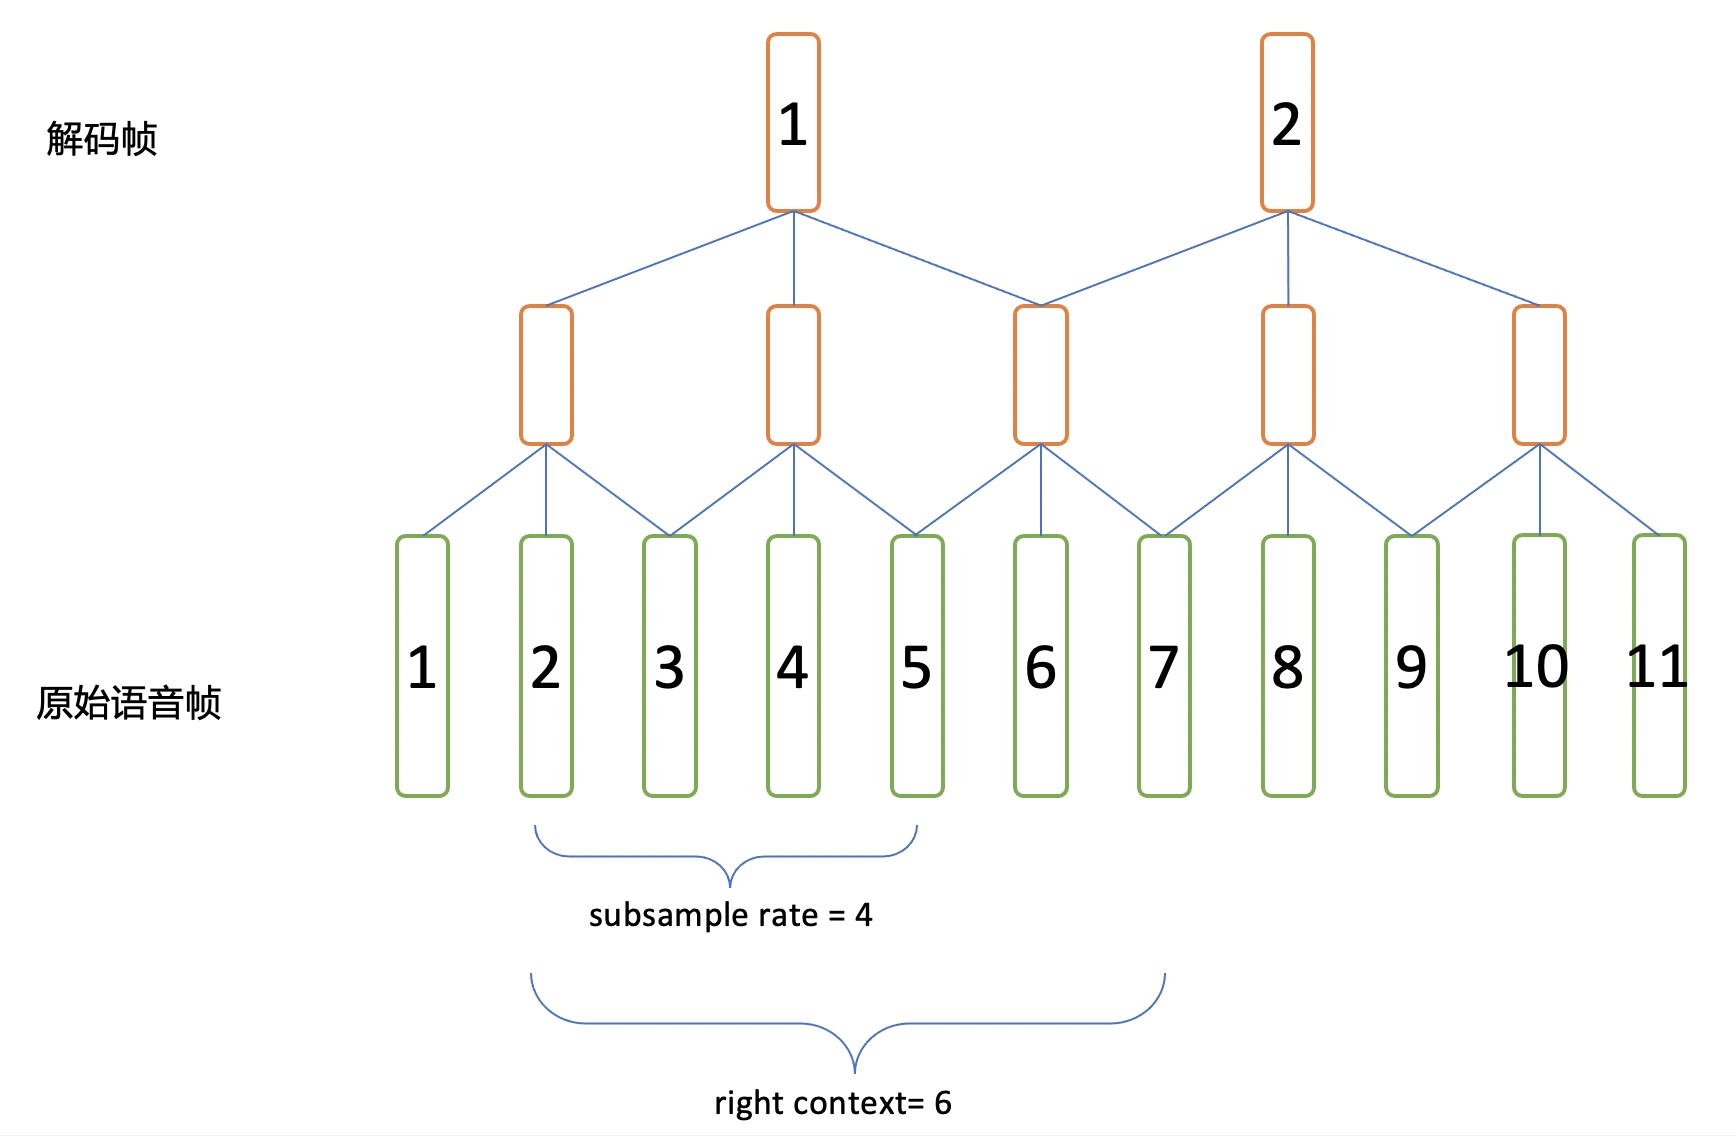
在CTC或者WFST解码时,我们是一帧一帧解码,这里的帧指的是subsample之后的帧。我们称为解码帧,而模型输入的帧序列里的帧(subsample之前的)称为原始语音帧。
在图里可以看到
- 第1个解码帧,需要依赖第1到第7个原始语音帧。
- 第2个解码帧,需要依赖第5到第11个原始语音帧。
subsampling_rate: 对于相邻两个解码帧,在原始帧上的间隔。
right_context: 对于某个解码帧,其对应的第一个原始帧的右侧还需要额外依赖多少帧,才能获得这个解码帧的全部信息。
在runtime decoder中,每次会送入一组帧进行前向计算并解码,一组(chunk)帧是定义在解码帧级别的,在处理第一个chunk时,接受输入获得当前chunk需要的所有的context,之后每次根据chunk大小和subsampling_rate获取新需要的原始帧。比如,chunk_size=1,则第一个chunk需要1-7帧,第二个chunk只要新拿到8-11帧即可。
# runtime/core/decoder/torch_asr_decoder.cc
TorchAsrDecoder::AdvanceDecoding()
    if (!start_) {                      // First chunk
      int context = right_context + 1;  // Add current frame
      num_requried_frames = (opts_.chunk_size - 1) * subsampling_rate + context;
    } else {
      num_requried_frames = opts_.chunk_size * subsampling_rate;
    }
Encoder Block
wenet/transformer/encoder_layer.py
对于Encoder, Wenet提供了Transformer和Conformer两种结构,Conformer在Transformer里引入了卷积层,是目前语音识别任务效果最好的模型之一。 强烈建议阅读这篇文章 The Annotated Transformer, 了解Transformer的结构和实现。
Transformer的self.encoders由一组TransformerEncoderLayer组成
self.encoders = torch.nn.ModuleList([
    TransformerEncoderLayer(
        output_size,
        MultiHeadedAttention(attention_heads, output_size,
                              attention_dropout_rate),
        PositionwiseFeedForward(output_size, linear_units,
                                dropout_rate), dropout_rate,
        normalize_before, concat_after) for _ in range(num_blocks)
])
Conformer的self.encoders由一组ConformerEncoderLayer组成
self.encoders = torch.nn.ModuleList([
    ConformerEncoderLayer(
        output_size,
        RelPositionMultiHeadedAttention(*encoder_selfattn_layer_args),
        PositionwiseFeedForward(*positionwise_layer_args),
        PositionwiseFeedForward(*positionwise_layer_args)
        if macaron_style else None,
        ConvolutionModule(*convolution_layer_args)
        if use_cnn_module else None,
        dropout_rate,
        normalize_before,
        concat_after,
    ) for _ in range(num_blocks)
])
仅介绍ConformerEncoderLayer,其涉及的主要模块有:
- RelPositionMultiHeadedAttention
- PositionwiseFeedForward
- ConvolutionModule
conformer论文中conformer block的结构如图
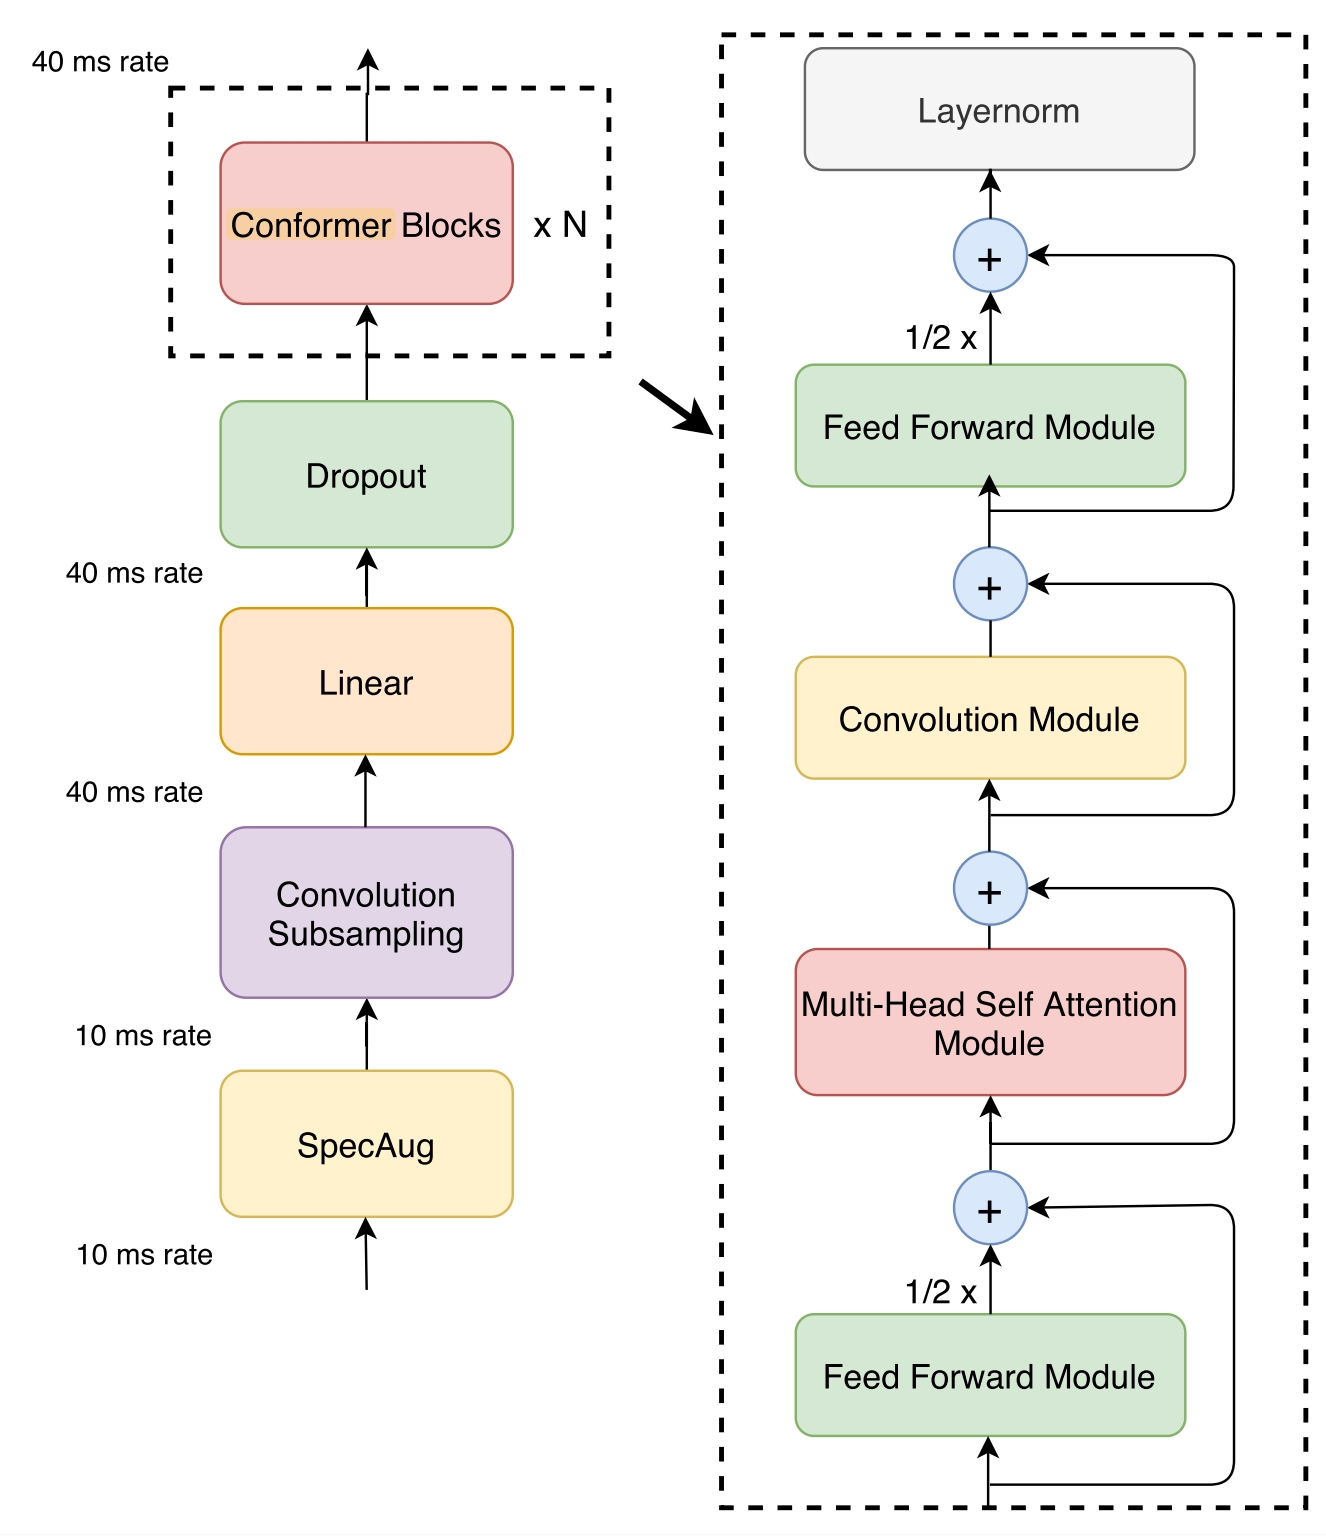
如果不考虑cache,使用normalize_before=True,feed_forward_macaron=True,则wenet中的ConformerEncoderLayer的forward可以简化为
class ConformerEncoderLayer(nn.Module):
    def forward(...):
        residual = x
        x = self.norm_ff_macaron(x)
        x = self.feed_forward_macaron(x)
        x = residual + 0.5 * self.dropout(x)

        residual = x
        x = self.norm_mha(x)
        x_att = self.self_attn(x, x, x, pos_emb, mask)
        x = residual + self.dropout(x_att)

        residual = x
        x = self.norm_conv(x)
        x, new_cnn_cache = self.conv_module(x, mask_pad, cnn_cache)
        x = residual + self.dropout(x)

        residual = x
        x = self.norm_ff(x)
        x = self.feed_forward(x)
        x = residual + 0.5 * self.dropout(x)

        x = self.norm_final(x)
可以看到,对于RelPositionMultiHeadedAttention,ConvolutionModule,PositionwiseFeedForward,都是前有Layernorm,后有Dropout,再搭配Residual。
Conformer Block - RelPositionMultiHeadedAttention
wenet/transformer/attention.py
attention.py中提供了两种attention的实现,MultiHeadedAttention和RelPositionMultiHeadedAttention。
MultiHeadedAttention用于Transformer。RelPositionMultiHeadedAttention用于Conformer。
原始的Conformer论文中提到的self-attention是Relative Position Multi Headed Attention,这是transformer-xl中提出的一种改进attention,和标准attention的区别在于,其中显示利用了相对位置信息,具体原理和实现可参考文章。 Conformer ASR中的Relative Positional Embedding
注意,wenet中实现的Relative Position Multi Headed Attention是存在问题的, 但是由于采用正确的实现并没有什么提升,就没有更新成transformer-xl中实现。
Conformer Block - PositionwiseFeedForward
wenet/transformer/positionwise_feed_forward.py
PositionwiseFeedForward,对各个帧时刻输入均使用同一个矩阵权重去做前向Affine计算,即通过一个[H1, H2]的的前向矩阵,把[B, T, H1]变为[B,T,H2]。
Conformer Block - ConvolutionModule
wenet/transformer/convolution.py
ConvolutionModule结构如下
Wenet中使用了因果卷积(Causal Convolution),即不看右侧上下文,这样无论模型含有多少卷积层,对右侧的上下文都无依赖。
原始的对称卷积,如果不进行左右padding,则做完卷积后长度会减小。
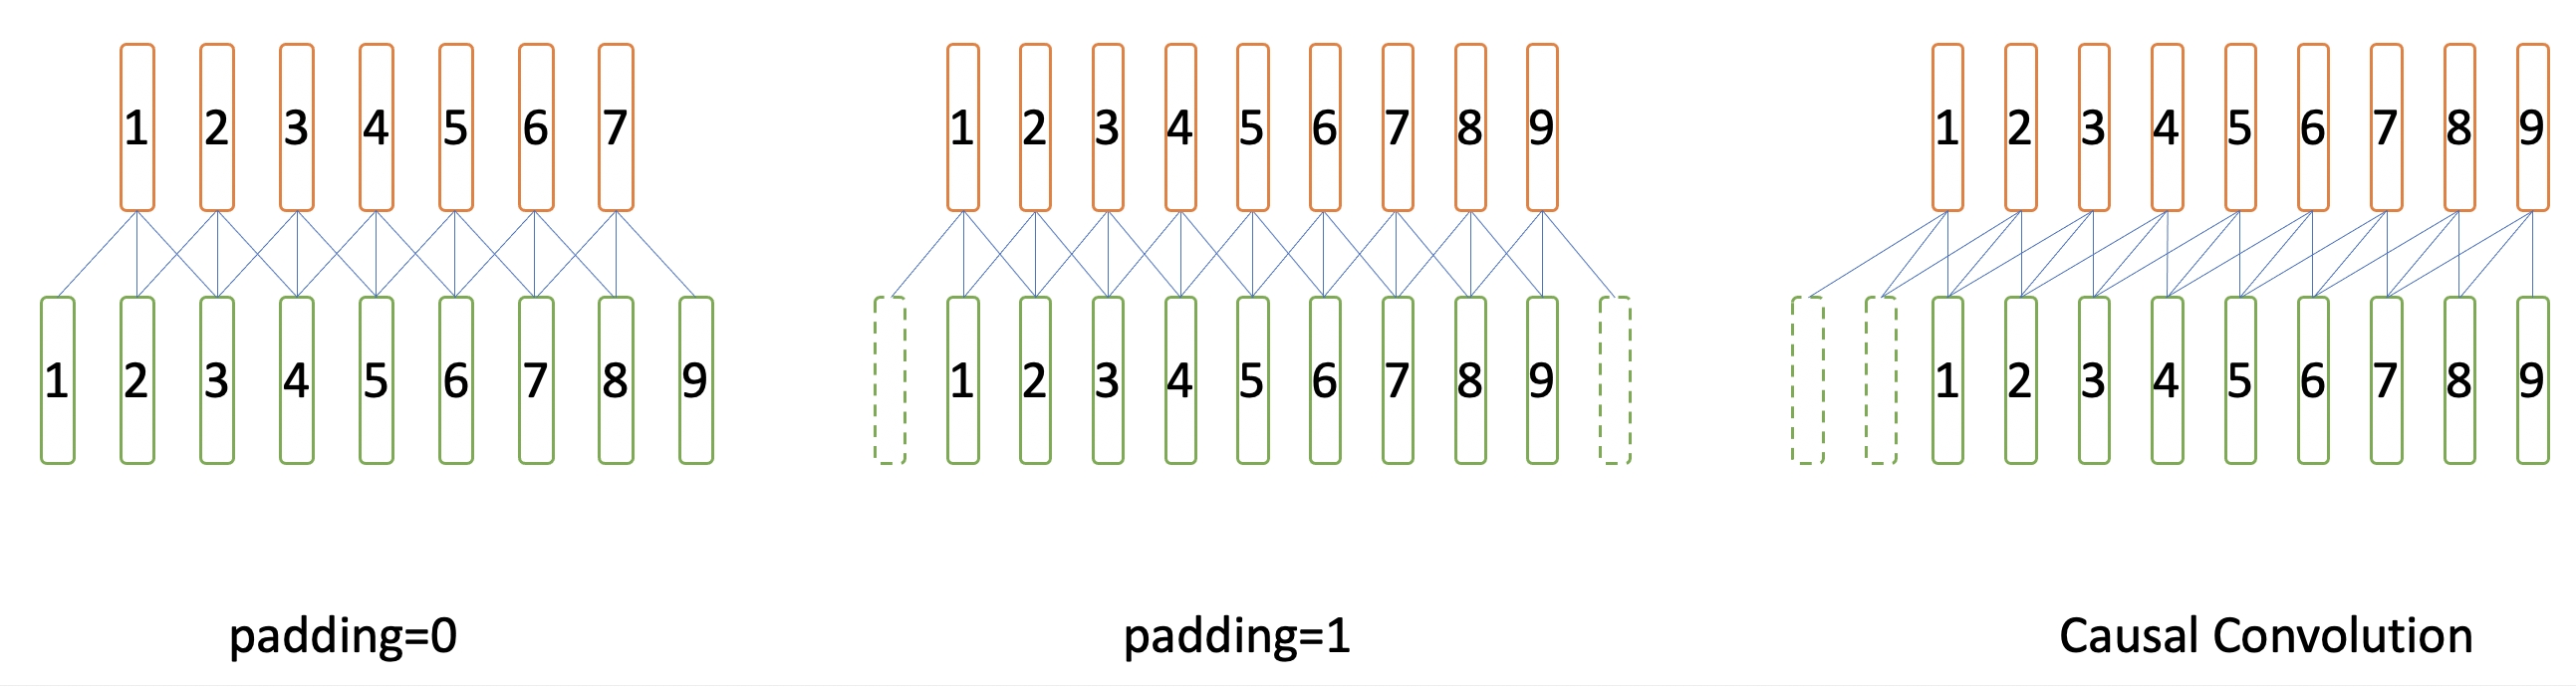
因此标准的卷积,为了保证卷积后序列长度一致,需要在左右各pad长度为(kernel_size - 1) // 2的 0.
  if causal: # 使用因果卷积
    padding = 0 # Conv1D函数设置的padding长度
    self.lorder = kernel_size - 1 # 因果卷积左侧手动padding的长度
  else: # 使用标准卷积
    # kernel_size should be an odd number for none causal convolution
    assert (kernel_size - 1) % 2 == 0
    padding = (kernel_size - 1) // 2 # Conv1D函数设置的padding长度
    self.lorder = 0
因果卷积的实现其实很简单,只在左侧pad长度为kernel_size - 1的0,即可实现。如图所示。
if self.lorder > 0:
  if cache is None:
    x = nn.functional.pad(x, (self.lorder, 0), 'constant', 0.0)
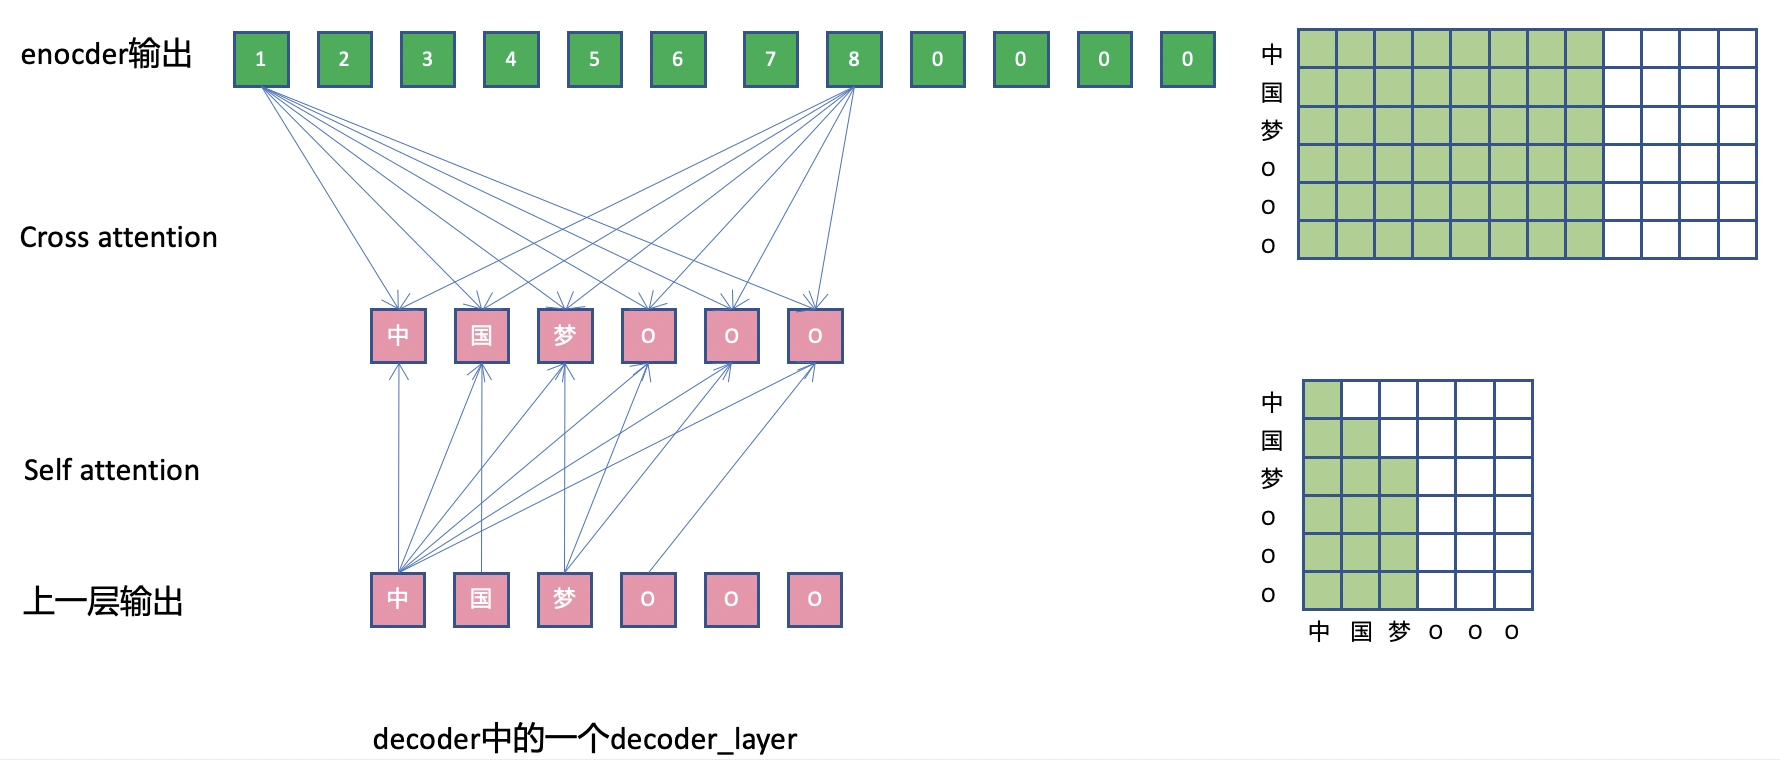
Attention based Decoder网络
对于Attention based Decoder, Wenet提供了自回归Transformer和双向自回归Transformer结构。 所谓自回归,既上一时刻的网络输出要作为网络当前时刻的输入,产生当前时刻的输出。
在ASR整个任务中,Attention based Decoder的输入是当前已经产生的文本,输出接下来要产生的文本,因此这个模型建模了语言模型的信息。
这种网络在解码时,只能依次产生输出,而不能一次产生整个输出序列。
和Encoder中的attention层区别在于,Decoder网络里每层DecoderLayer,除了进行self attention操作(self.self_attn),也和encoder的输出进行cross attention操作(self.src_attn)
另外在实现上,由于自回归和cross attention,mask的使用也和encoder有所区别。
CTC Loss
wenet/transformer/ctc.py
CTC Loss包含了CTC decoder和CTC loss两部分,CTC decoder仅仅对Encoder做了一次前向线性计算,然后计算softmax.
    # hs_pad: (B, L, NProj) -> ys_hat: (B, L, Nvocab)
    ys_hat = self.ctc_lo(F.dropout(hs_pad, p=self.dropout_rate))
    # ys_hat: (B, L, D) -> (L, B, D)
    ys_hat = ys_hat.transpose(0, 1)
    ys_hat = ys_hat.log_softmax(2)
    loss = self.ctc_loss(ys_hat, ys_pad, hlens, ys_lens)
    # Batch-size average
    loss = loss / ys_hat.size(1)
    return loss
CTC loss的部分则直接使用的torch提供的函数 torch.nn.CTCLoss.
self.ctc_loss = torch.nn.CTCLoss(reduction=reduction_type)
Attention based Decoder Loss
wenet/transformer/label_smoothing_loss.py
Attention-based Decoder的Loss是在最大化自回归的概率,在每个位置计算模型输出概率和样本标注概率的Cross Entropy。这个过程采用teacher forcing的方式,而不采用scheduled sampling。
每个位置上,样本标注概率是一个one-hot的表示,既真实的标注概率为1,其他概率为0. Smoothing Loss中,对于样本标注概率,将真实的标注概率设置为1-e,其他概率设为e/(V-1)。
网络的完整结构
通过print()打印出的ASRModel的网络结构。
ASRModel(
  (encoder): ConformerEncoder(
    (global_cmvn): GlobalCMVN()
    (embed): Conv2dSubsampling4(
      (conv): Sequential(
        (0): Conv2d(1, 256, kernel_size=(3, 3), stride=(2, 2))
        (1): ReLU()
        (2): Conv2d(256, 256, kernel_size=(3, 3), stride=(2, 2))
        (3): ReLU()
      )
      (out): Sequential(
        (0): Linear(in_features=4864, out_features=256, bias=True)
      )
      (pos_enc): RelPositionalEncoding(
        (dropout): Dropout(p=0.1, inplace=False)
      )
    )
    (after_norm): LayerNorm((256,), eps=1e-12, elementwise_affine=True)
    (encoders): ModuleList(
      (0): ConformerEncoderLayer(
        (self_attn): RelPositionMultiHeadedAttention(
          (linear_q): Linear(in_features=256, out_features=256, bias=True)
          (linear_k): Linear(in_features=256, out_features=256, bias=True)
          (linear_v): Linear(in_features=256, out_features=256, bias=True)
          (linear_out): Linear(in_features=256, out_features=256, bias=True)
          (dropout): Dropout(p=0.0, inplace=False)
          (linear_pos): Linear(in_features=256, out_features=256, bias=False)
        )
        (feed_forward): PositionwiseFeedForward(
          (w_1): Linear(in_features=256, out_features=2048, bias=True)
          (activation): Swish()
          (dropout): Dropout(p=0.1, inplace=False)
          (w_2): Linear(in_features=2048, out_features=256, bias=True)
        )
        (feed_forward_macaron): PositionwiseFeedForward(
          (w_1): Linear(in_features=256, out_features=2048, bias=True)
          (activation): Swish()
          (dropout): Dropout(p=0.1, inplace=False)
          (w_2): Linear(in_features=2048, out_features=256, bias=True)
        )
        (conv_module): ConvolutionModule(
          (pointwise_conv1): Conv1d(256, 512, kernel_size=(1,), stride=(1,))
          (depthwise_conv): Conv1d(256, 256, kernel_size=(15,), stride=(1,), groups=256)
          (norm): LayerNorm((256,), eps=1e-05, elementwise_affine=True)
          (pointwise_conv2): Conv1d(256, 256, kernel_size=(1,), stride=(1,))
          (activation): Swish()
        )
        (norm_ff): LayerNorm((256,), eps=1e-12, elementwise_affine=True)
        (norm_mha): LayerNorm((256,), eps=1e-12, elementwise_affine=True)
        (norm_ff_macaron): LayerNorm((256,), eps=1e-12, elementwise_affine=True)
        (norm_conv): LayerNorm((256,), eps=1e-12, elementwise_affine=True)
        (norm_final): LayerNorm((256,), eps=1e-12, elementwise_affine=True)
        (dropout): Dropout(p=0.1, inplace=False)
        (concat_linear): Linear(in_features=512, out_features=256, bias=True)
      )
      ...
    )
  )
 (decoder): TransformerDecoder(
    (embed): Sequential(
      (0): Embedding(4233, 256)
      (1): PositionalEncoding(
        (dropout): Dropout(p=0.1, inplace=False)
      )
    )
    (after_norm): LayerNorm((256,), eps=1e-12, elementwise_affine=True)
    (output_layer): Linear(in_features=256, out_features=4233, bias=True)
    (decoders): ModuleList(
      (0): DecoderLayer(
        (self_attn): MultiHeadedAttention(
          (linear_q): Linear(in_features=256, out_features=256, bias=True)
          (linear_k): Linear(in_features=256, out_features=256, bias=True)
          (linear_v): Linear(in_features=256, out_features=256, bias=True)
          (linear_out): Linear(in_features=256, out_features=256, bias=True)
          (dropout): Dropout(p=0.0, inplace=False)
        )
        (src_attn): MultiHeadedAttention(
          (linear_q): Linear(in_features=256, out_features=256, bias=True)
          (linear_k): Linear(in_features=256, out_features=256, bias=True)
          (linear_v): Linear(in_features=256, out_features=256, bias=True)
          (linear_out): Linear(in_features=256, out_features=256, bias=True)
          (dropout): Dropout(p=0.0, inplace=False)
        )
        (feed_forward): PositionwiseFeedForward(
          (w_1): Linear(in_features=256, out_features=2048, bias=True)
          (activation): ReLU()
          (dropout): Dropout(p=0.1, inplace=False)
          (w_2): Linear(in_features=2048, out_features=256, bias=True)
        )
        (norm1): LayerNorm((256,), eps=1e-12, elementwise_affine=True)
        (norm2): LayerNorm((256,), eps=1e-12, elementwise_affine=True)
        (norm3): LayerNorm((256,), eps=1e-12, elementwise_affine=True)
        (dropout): Dropout(p=0.1, inplace=False)
        (concat_linear1): Linear(in_features=512, out_features=256, bias=True)
        (concat_linear2): Linear(in_features=512, out_features=256, bias=True)
      )
      ...
    )
  )
  (ctc): CTC(
    (ctc_lo): Linear(in_features=256, out_features=4233, bias=True)
    (ctc_loss): CTCLoss()
  )
  (criterion_att): LabelSmoothingLoss(
    (criterion): KLDivLoss()
  )
)
第3节: 进阶话题:Mask
在Wenet的模型实现时,涉及到一些论文中没有描述细节,比如:
- 一个batch内的输入帧数不等长,进行padding的部分如何处理
- 一个batch内标注文本不等长,进行padding的部分如何处理
- decoder的自回归依赖关系如何表达
- chunk-based的encoder如何实现
这些细节会对convolution和attention网络以及loss的计算带来影响。 因此在实现时,需要引入各种mask来进行处理。本节通过系统的介绍Wenet代码中涉及的mask,帮助初学者更好的理解wenet的实现。
可以参考wenet/utils/mask.py中的注释也提供了说明和示例。
三类问题
问题1:Batch Padding
一个batch内部各个样本长度不同,但是pytorch这类框架,处理的基本数据格式形式规整tensor,比如一个矩阵,因此输入和标注都需要padding,补上一些数据变成相等长度的序列再进行处理。
Wenet中, 输入的padding叫做frame batch padding,标注的padding叫label batch padding。
处理Padding对Loss的影响
在计算Loss时,需要避免label batch padding带来的影响。
Attention Loss
标注的padding的部分,使用一个特殊整数padding_idx来进行填补。在计算Attention loss时,如果标注值为padding_idx,则不参与loss的计算。
    ignore = target == self.padding_idx  # (B,)
    total = len(target) - ignore.sum().item()
    target = target.masked_fill(ignore, 0)  # avoid -1 index
    true_dist.scatter_(1, target.unsqueeze(1), self.confidence)
    kl = self.criterion(torch.log_softmax(x, dim=1), true_dist)
    denom = total if self.normalize_length else batch_size
    return kl.masked_fill(ignore.unsqueeze(1), 0).sum() / denom
CTC loss
torch.nn.CTCLoss接口支持指定Batch内各个输出序列的长度hlens和各个标注序列的长度ys_lens
self.ctc_loss = torch.nn.CTCLoss(reduction=reduction_type)
loss = self.ctc_loss(ys_hat, ys_pad, hlens, ys_lens)
hlens是encoder输出的Batch中各序列真实长度(除去padding部分的长度)。可以通过encoder_mask得到,encoder_mask会在后面介绍
# wenet/transformer/asr_model.py
encoder_out_lens = encoder_mask.squeeze(1).sum(1)
ys_lens是batch中各标注序列的真实长度,由dataloader返回的target_lengths得到。
# wenet/utils/executor.py
for batch_idx, batch in enumerate(data_loader):
    key, feats, target, feats_lengths, target_lengths = batch
处理模型输入Padding
模型的输入分为两个部分:
- Encoder的输入
- 声音特征序列: frame batch padding
- Decoder的输入
- Encoder的输出: 降采样后的frame batch padding
- 标注文本序列: label batch padding
实现时通过mask技巧对这些padding进行处理。mask是一个0,1值组成的掩码张量,wenet里mask的语义为:mask中值为1的部分是要考虑的,0的部分不考虑。
Wenet的mask大致可分为两类:
- 序列mask,(Batch, Length), 每个 (Length,) 中值为1的位置代表了本序列要考虑的部分。
- Attention mask,(Batch, L1, L2),每个(L1,L2) 用于约束L1中的哪些位置只能对于L2中的哪些位置进行attention操作。
问题2: 自回归
Attention Decoder的结构是自回归的,即每个word只能看到自己以及左侧的words。所以其中的attention操作实现时,每个位置只能和当前位置以及左侧的位置进行操作。为了实现这个操作,需要引入一个mask。
问题3: Chunk-Based Model
因为full attention每一帧都要依赖右侧所有帧,所以无法应用于流式解码中,Wenet采用chunk-based attention,将帧分为等大小的chunk,每个chunk内的帧只在chunk内部进行attention操作。 另外,也允许和左侧的一定长度的帧进行attention。这种固定chunk大小的训练模式,要求解码时必须采用同样大小的帧。Wenet引入了一种dynamic chunk training算法,在训练时可以动态为每个batch生成不同大小的 chunk,这样,在解码时,chunk大小可以任意指定,大的chunk可以获得高识别率,小的chunk可以获得低延时,从而用户仅需训练单一模型,根据具体场景在解码时选择合适的chunk大小,而无需重新训练模型。
网络各部分的实现
Encoder中的mask
wenet/transformer/encoder.py
def forward()
    ...
    masks = ~make_pad_mask(xs_lens).unsqueeze(1)  # (B, 1, L)
    xs, pos_emb, masks = self.embed(xs, masks)
    mask_pad = masks
    chunk_masks = add_optional_chunk_mask(xs, masks,
                                              self.use_dynamic_chunk,
                                              self.use_dynamic_left_chunk,
                                              decoding_chunk_size,
                                              self.static_chunk_size,
                                              num_decoding_left_chunks)
    for layer in self.encoders:
        xs, chunk_masks, _ = layer(xs, chunk_masks, pos_emb, mask_pad)
- self.embed会对frame padding mask进行降采样得到subsample frame padding mask。
- mask_pad在Conformer Block中的卷积网络中使用。
- add_optional_chunk_mask会在subsample frame padding mask基础上增加chunk mask,在Conformer Block中的self attention网络使用。
Subsampling中的mask
subsampling网络中的卷积运算时本身不使用frame padding mask,但是会对frame padding mask降采样得到subsample frame padding mask,后续在进行encoder相关计算时会使用这个subsample frame padding mask.
比如在4倍降采样的网络里,使用了两个stride=2的卷积,对shape=(B, 1, L) 的mask进行了mask[:, :, :-2:2][:, :, :-2:2]的操作,新的mask的shape为(B, 1, L/4)。
但是目前的实现存在小问题,最后几个解码帧(降采样帧)如果其卷积野中有padding的帧,则该降采样帧输入无效帧,不该参与后续计算,但是按照目前mask的实现仍会被使用。
举个例子,训练时,某个样本的倒数4个原始帧都是padding的,最后一个解码帧依赖于这些padding帧,因此不应该使用,其mask计算过程如下:
原始mask(单个样本)
1 1 1 1 1 1 1 0 0 0 0
经过subsample后的mask
1   1   1   1   0
1       1
注意,此时根据计算出对subsample padding mask,仍然会使用最后一个解码帧。
类似的,如果倒数5个原始帧都是padding的,那么此时倒数两个解码帧信息都不全,都不应该使用,但是subsample padding mask仍然会使用两个解码帧。可以自行验证下。
不过这个"不完美"的实现问题对训练影响不大,只会影响最后1到2帧,相当于给模型增加了一些干扰。
Conformer Block中的Conv的mask
考虑图中多层卷积的情况,假设kernel大小为3。 由于batch paddings的存在,在训练时,绿色单元依赖于红色单元,而红色单元不是0值。 然而在解码时,因为没有batch padding存在,绿色单元依赖的红色单元位置的值是由conv paddings产生的,这个值是0值,所以如果不进行任何处理,存在训练和解码不一致的问题。
因此,代码里利用subsample frame padding,将每一层的batch padding部分的值变为0.
# wenet/transformer/convolution.py
# def forward():
    x.masked_fill_(~mask_pad, 0.0)
不过如果使用casual conv中,由于其结构的特点,每个点不依赖于自己右侧的点,则不需要这个mask。
MultiHeadedAttention Module的Mask实现
MultiHeadedAttention可以用于三种不同的attention
- Encoder中的self-attention
- Decoder中的self-attention
- Decoder中的cross-attention
不同的情况下,attention的mask会有所区别。
- 用于self-attention时,每个样本的mask是一个长和高一样大小的方阵。
- 用于cross-attention时,mask的纵轴从上到下为文本序列,横轴从左到右为帧序列。
MultiHeadedAttention的forward函数注释里说明了在不同情况下传入的mask的shape不同。
# wenet/transformer/attention.py
def forward(self, query: torch.Tensor, key: torch.Tensor,
            value: torch.Tensor,
            mask: Optional[torch.Tensor]) -> torch.Tensor:
    """Compute scaled dot product attention.

    Args:
        query (torch.Tensor): Query tensor (#batch, time1, size).
        key (torch.Tensor): Key tensor (#batch, time2, size).
        value (torch.Tensor): Value tensor (#batch, time2, size).
        mask (torch.Tensor): Mask tensor (#batch, 1, time2) or
            (#batch, time1, time2).
            1.When applying cross attention between decoder and encoder,
            the batch padding mask for input is in (#batch, 1, T) shape.
            2.When applying self attention of encoder,
            the mask is in (#batch, T, T)  shape.
            3.When applying self attention of decoder,
            the mask is in (#batch, L, L)  shape.
            4.If the different position in decoder see different block
            of the encoder, such as Mocha, the passed in mash could be
            in (#batch, L, T) shape. But there is no such case in current
            Wenet.
    """
具体实现
计算attention的权重时使用mask:先将不需要计算的位置的score设为负无穷而不是0,然后计算softmax得到位置权重,再把不需要参与attention计算的位置的权重系数设为0.
# wenet/transformer/attention.py
def forward_attention ():
    ...
    mask = mask.unsqueeze(1).eq(0)  # (batch, 1, *, time2)
    scores = scores.masked_fill(mask, -float('inf'))
    attn = torch.softmax(scores, dim=-1).masked_fill(mask, 0.0)  # (batch, head, time1, time2)
mask.unsqueeze(1)是为了增加一个head维度。此时:
- 当用于decoder cross-attention时, mask的shape为(batch, 1, 1, Tmax), scores的shape为(batch, head, Lmax, Tmax),第1,第2维会进行broadcast
- 当用于decoder self-attention时, mask的shape为(batch, 1, Lmax, Lmax), scores的shape为(batch, head, Lmax, Lmax),第1维会进行broadcast
- 当用于encoder self-attention时, mask的shape为(batch, 1, Tmax, Tmax), scores的shape为(batch, head, Tmax, Tmax),第1维会进行broadcast
Chunk-based mask
为了实现流式解码,encoder中使用了基于chunk的attention,并允许各个batch使用不同的chunk大小。
基于chunk的attention,本质上是去限制attention的作用范围,可以通过attention mask来实现。
- subsequent_chunk_mask方法用于创建一个固定大小chunk的mask。
- add_optional_chunk_mask方法则用于创建动态大小的chunk的mask。
def add_optional_chunk_mask(xs: torch.Tensor, masks: torch.Tensor,
                            use_dynamic_chunk: bool,
                            use_dynamic_left_chunk: bool,
                            decoding_chunk_size: int, static_chunk_size: int,
                            num_decoding_left_chunks: int):
- use_dynamic_chunk=Ture, 各的batch使用随机的chunk mask。
- 如果 use_dynamic_left_chunk=True, 各的batch使用随机的的left chunk长度依赖
- 如果 use_dynamic_left_chunk=False, 各的batch使用均依赖开头到当前chunk
- use_dynamic_chunk = false, static_chunk_size <= 0. 使用full-attention.
- use_dynamic_chunk = false, static_chunk_size > 0. 使用固定的chunk mask.
Decoder中的mask
Decoder涉及到两种Attention。 self.self_attn是decoder上的self attention。 self.src_attn是decoder和encoder的cross attention。
# wenet/transformer/decoder_layer.py
def forward():
    ...
    self.self_attn(tgt_q, tgt, tgt, tgt_q_mask)
    self.src_attn(x, memory, memory, memory_mask)
    ...
Self attention
self attention中要考虑自回归和label batch padding带来的影响。
wenet/transformer/decoder.py
        tgt = ys_in_pad
        # tgt_mask: (B, 1, L)
        tgt_mask = (~make_pad_mask(ys_in_lens).unsqueeze(1)).to(tgt.device)
        # m: (1, L, L)
        m = subsequent_mask(tgt_mask.size(-1),
                            device=tgt_mask.device).unsqueeze(0)
        # tgt_mask: (B, L, L)
        tgt_mask = tgt_mask & m
- ~make_pad_mask产生的tgt_mask是label padding mask,每个words不允许对padding部分进行attention操作。
- subsequent_mask产生的m是decoder的自回归mask,每个words只对自己以及左侧的words进行attention操作。
如图中所示,自回归mask和label padding mask被同时使用。
不过,由于decoder本身是自回归的,自回归掩码保证了对于非padding的位置,均不会去计算自己右侧的位置,而对于padding位置,在loss中会处理,不参与最后的loss计算。 因此,其实并不需要label padding mask(代码中的tgt_mask).
Cross attention
进行Cross attention, 由于encoder的一些输出是padding产生的,需要利用subsample frame padding mask.
整体结构
Decoder中每一层中,均需要计算如上两个attention,从网络视角来看,如下图所示。
其他
在进行Batch解码时,还用到了mask_finished_scores和mask_finished_preds,本文不进行介绍
第4节: 进阶话题:Cache
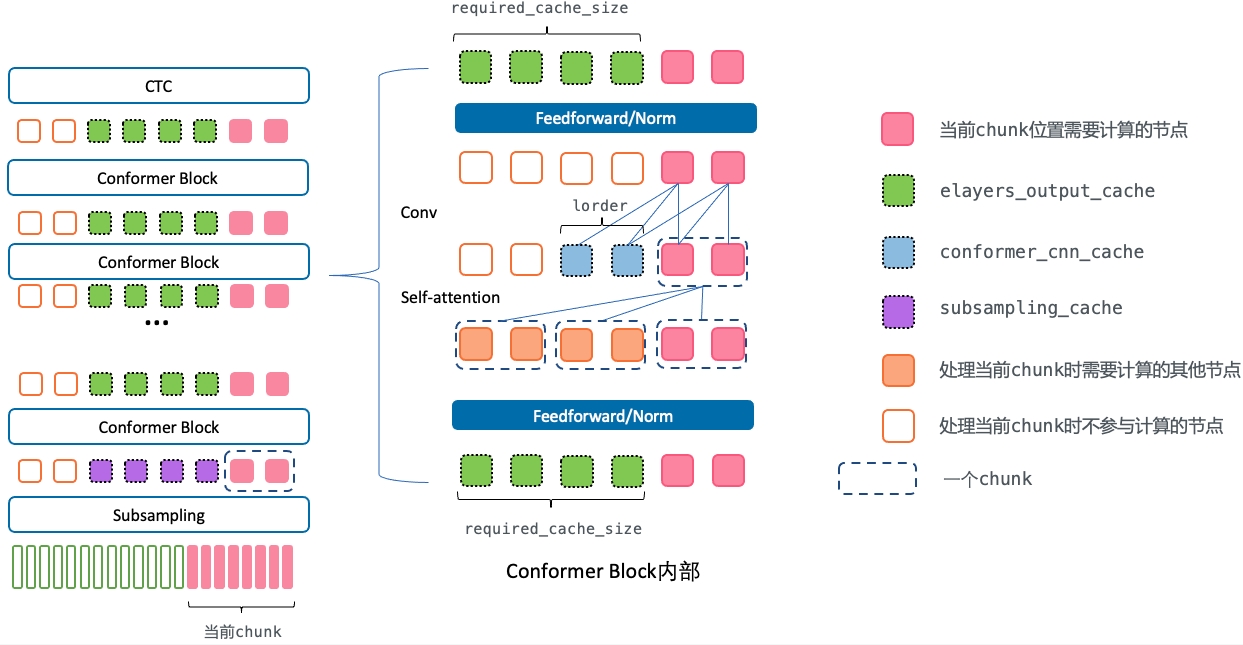
标准的forward是整个序列进行计算,但是在流式推断时,需要chunk级别的forward,因此需要引入cache的概念,即当前chunk的进行前向计算时,需要拿到上次前向的一些结果作为输入。
什么是cache?
对于流式推断,输入是一个个chunk的到来,对第i个chunk,当计算第k层网络的输出时,由于网络结构存在对左侧上下文的依赖,需要依赖第k-1层网络里在i之前的一些chunks的输出。 如果对于当前到来chunk,将其和依赖的chunk序列(比如10层self-attention层,每层依赖左侧4个chunk,则累积起来需要依赖左侧40个chunk)拼起来作为网络输入进行前向,其计算量会比较大。 对于那些已经计算过的chunk,可以将那些在计算下一个chunk的输出时需要的中间量保存下来,从而减少重复计算。这种方式就叫cache。
另外,wenet的网络在设计时,对于因果卷积和self-attention的左侧上下文都使用有限长度,因此无论序列多长,每次cache的大小是不变的(不增长)。
仅仅encoder部分涉及chunk计算时的cache。
- 对于CTC decoder,由于是线性层,不需要cache。
- 对于AED decoder,是在计算完整个序列的encoder输出后进行rescoring,不涉及chunk。
Runtime流式解码
asr_model.py中的forward_encoder_chunk()通过jit导出,用于C++ runtime,其内部使用了encoder.py中的forward_chunk()函数。
# wenet/transformer/asr_model.py

@torch.jit.export
    def forward_encoder_chunk()
Python流式解码
如果设置simulate_streaming为True,则会模拟runtime流时解码的过程,将数据分成chunk,依次进行前向计算。 该方法的结果,和送入整个序列通过mask进行流式模拟的结果应该是一致的。
recognize() -> _forward_encoder() -> BaseEncoder.forward_chunk_by_chunk()
forward_chunk_by_chunk()的内部也是使用的forward_chunk()函数。
BaseEncoder.forward_chunk()分析
forward_chunk()是对单个chunk进行前向计算的核心函数。下面从该函数的内容来了解cache的实现。
# wenet/transformer/encoder.py
def forward_chunk(
        self,
        xs: torch.Tensor,
        offset: int,
        required_cache_size: int,
        subsampling_cache: Optional[torch.Tensor] = None,
        elayers_output_cache: Optional[List[torch.Tensor]] = None,
        conformer_cnn_cache: Optional[List[torch.Tensor]] = None,
    ) -> Tuple[torch.Tensor, torch.Tensor, List[torch.Tensor],
               List[torch.Tensor]]:
xs是当前的chunk输入,由于对于单个chunk的前向计算,需要之前的chunk的计算得到的信息,因此这里需要传入相关的三个cache信息。
- subsampling_cache:torch.Tensor subsampling的输出的cache。即第一个conformer block的输入。
- elayers_output_cache:List[torch.Tensor] 第1个到最后1个conformer block的输出的cache。也就是第2个conformer block的输入和CTC层的输入
- conformer_cnn_cache:List[torch.Tensor] conformer block里的conv层的左侧依赖的输入cache
cache的大小
- subsampling_cache和elayers_output_cache的大小 由self-attention是对左侧的依赖长度required_cache_size决定。 decoding_chunk_size是解码帧级别的chunk大小, num_decoding_left_chunks是self-attention依赖的左侧chunk数。
required_cache_size = decoding_chunk_size * num_decoding_left_chunks
- conformer_cnn_cache的大小和required_cache_size无关,由casual网络的左侧上下文lorder决定。
函数返回了四个值,包括当前chunk输入对应的输出,更新后的三个cache。
该函数的整个计算过程请参考下图
offset
当按chunk进行输入时,不能直接得到chunk在序列中的位置,需要传入offset给出该chunk在整个序列里的偏移,用于计算positional encoding。
xs, pos_emb, _ = self.embed(xs, tmp_masks, offset)
subsampling内部
subsampling内部的计算虽然存在冗余,但是不进行cache。一个是其实现比较复杂,另一个原因是subsampling的计算量占比不大。
subsampling_cache
subsampling的输出的cache。即第一个conformer block的输入。
if subsampling_cache is not None:
    cache_size = subsampling_cache.size(1)
    # xs是第一个conformer block的输入
    xs = torch.cat((subsampling_cache, xs), dim=1)
else:
    cache_size = 0
pos_emb = self.embed.position_encoding(offset - cache_size, xs.size(1))
if required_cache_size < 0:
    next_cache_start = 0
elif required_cache_size == 0:
    next_cache_start = xs.size(1)
else:
    next_cache_start = max(xs.size(1) - required_cache_size, 0)
# 更新subsampling_cache
r_subsampling_cache = xs[:, next_cache_start:, :]
elayers_output_cache
第1个到最后1个conformer block的输出的cache。也就是第2个conformer block的输入和CTC层的输入。
for i, layer in enumerate(self.encoders):
    attn_cache = elayers_output_cache[i]
    cnn_cache = conformer_cnn_cache[i]
    xs, _, new_cnn_cache = layer(xs,
        masks,
        pos_emb,
        output_cache=attn_cache,
        cnn_cache=cnn_cache)
    # 更新elayers_output_cache
    r_elayers_output_cache.append(xs[:, next_cache_start:, :])
注意,此处的xs不是当前的chunk,而是当前chunk+cache输入,所以其长度不是chunk_size, 而是chunk_size + required_cache_size。
# wenet/transformer/encoder.py BaseEncoder.forward_chunk()
# 第一个conformer block输入的xs
xs = torch.cat((subsampling_cache, xs), dim=1)


# wenet/transformer/encoder_layer.py ConformerEncoderLayer.forward()
# 之后的conformer block输入的xs
if output_cache is not None:
    x = torch.cat([output_cache, x], dim=1)
layer()对应着wenet/transformer/encoder_layer.py中的ConformerEncoderLayer.forward()。下面是其具体过程。
# 计算feedforwad/res/norm(包含当前chunk和左侧num_decoding_left_chunks个chunk)

# 使用cache时,只要计算当前chunk x_q的self-attentionattention和residual

chunk = x.size(1) - output_cache.size(1)
x_q = x[:, -chunk:, :]

# 只选择当前chunk对应的部分做residual计算
residual = residual[:, -chunk:, :]

# 选取当前chunk对应的mask,
mask = mask[:, -chunk:, :]

# 使用当前chunk的x_q去和其依赖的x做attention
x = residual + self.dropout(self.self_attn(x_q, x, x, mask))

# 仅计算计算当前chunk的conv
x, new_cnn_cache = self.conv_module(x, mask_pad, cnn_cache)

# 仅计算当前chunk的feedforwad/res/norm
x = self.norm2(x)
x = residual + self.dropout(self.feed_forward(x))

# 可以看到通过cache节省了x[:, :-chunk, :]部分的attention/conv以及之后的feedforwad/res/norm计算

# chunk的输出和cache拼在一起,作为网络的最终输出。
x = torch.cat([output_cache, x], dim=1)
注意,self-attention之前的一些前向计算其实仍然存在冗余,如果对attention层的输入进行cache,而不是对conformer block层的输入cache,可以进一步降低计算量。
conformer_cnn_cache
conformer block里的conv层的左侧依赖的输入cache。
conformer_cnn_cache大小为lorder,即因果卷积左侧依赖,。
# wenet/transformer/encoder_layer.py ConformerEncoderLayer.forward()
# conformer_cnn_cache通过ConvolutionModule.forward()返回的新cache来更新
x, new_cnn_cache = self.conv_module(x, mask_pad, cnn_cache)
# wenet/transformer/convolution.py ConvolutionModule.forward()
if self.lorder > 0:
    if cache is None:
        x = nn.functional.pad(x, (self.lorder, 0), 'constant', 0.0)
    else:
        x = torch.cat((cache, x), dim=2)
    # 更新 conformer_cnn_cache
    new_cache = x[:, :, -self.lorder:]
感谢阅读,欢迎使用wenet!
欢迎扫码关注我的微信公众号,及时获取文章更新

本文作者:StubbornHuang
版权声明:本文为站长原创文章,如果转载请注明原文链接!
原文标题:深度学习 – 语音识别框架Wenet网络设计与实现
原文链接:https://www.stubbornhuang.com/2479/
发布于:2023年01月13日 13:06:48
修改于:2023年06月21日 17:16:50
声明:本站所有文章,如无特殊说明或标注,均为本站原创发布。任何个人或组织,在未征得本站同意时,禁止复制、盗用、采集、发布本站内容到任何网站、书籍等各类媒体平台。如若本站内容侵犯了原著者的合法权益,可联系我们进行处理。


超级棒的博客帖,也是超级棒的网站,希望可以一直做下去!!
感谢您的支持