


WordPress – 为文章增加评论才可查看相关隐藏内容的代码
1 比较普通的CSS的代码
在主题的function.php中加入以下代码:
function reply_to_read($atts, $content=null) {
        extract(shortcode_atts(array("notice" => '<p class="reply-to-read" style="border-width: 1px 1px 1px 1px;border-color: #F2F2F2;line-height: 150%;"><blockquote><font color="#ff0000"><b>温馨提示</b></font>: 隐藏内容需要<a href="#respond" title="点击进行评论"> 回复评论 </a>后才能查看, 评论后请 <strong><a href="javascript:location.reload()" title="点击刷新"> 刷新 !</a></strong>.</blockquote></p>'), $atts));
        $email = null;
        $user_ID = (int) wp_get_current_user()->ID;
        if ($user_ID > 0) {
            $email = get_userdata($user_ID)->user_email;
            //对博主直接显示内容
            $admin_email = "xxxxxxx@xx.com"; //把左面的邮箱换成博主Email
            if ($email == $admin_email) {
                return $content;
            }
        } else if (isset($_COOKIE['comment_author_email_' . COOKIEHASH])) {
            $email = str_replace('%40', '@', $_COOKIE['comment_author_email_' . COOKIEHASH]);
        } else {
            return $notice;
        }
        if (empty($email)) {
            return $notice;
        }
        global $wpdb;
        $post_id = get_the_ID();
        $query = "SELECT `comment_ID` FROM {$wpdb->comments} WHERE `comment_post_ID`={$post_id} and `comment_approved`='1' and `comment_author_email`='{$email}' LIMIT 1";
        if ($wpdb->get_results($query)) {
            return do_shortcode($content);
        } else {
            return $notice;
        }
    }
    add_shortcode('reply', 'reply_to_read');
2 增加了红点边框的CSS的代码
在主题的function.php中加入以下代码:
function reply_to_read($atts, $content=null) {
        extract(shortcode_atts(array("notice" => '<p class="reply-to-read" style="text-align:center; border:2px solid #f00; border-style:dotted; border-radius:4px; padding:5px; margin:10px;"><strong style="color: red;">温馨提示:</strong>为了避免资源链接被和谐,此处内容需要您<strong><a href="#respond" title="点击进行评论"> 回复评论 </a></strong>后才能查看, 评论后请 <strong><a href="javascript:location.reload()" title="点击刷新"> 刷新!</a></strong></p>'), $atts));
        $email = null;
        $user_ID = (int) wp_get_current_user()->ID;
        if ($user_ID > 0) {
            $email = get_userdata($user_ID)->user_email;
            //对博主直接显示内容
            $admin_email = "xxxxxxx@xx.com"; //把左面的邮箱换成博主Email
            if ($email == $admin_email) {
                return $content;
            }
        } else if (isset($_COOKIE['comment_author_email_' . COOKIEHASH])) {
            $email = str_replace('%40', '@', $_COOKIE['comment_author_email_' . COOKIEHASH]);
        } else {
            return $notice;
        }
        if (empty($email)) {
            return $notice;
        }
        global $wpdb;
        $post_id = get_the_ID();
        $query = "SELECT `comment_ID` FROM {$wpdb->comments} WHERE `comment_post_ID`={$post_id} and `comment_approved`='1' and `comment_author_email`='{$email}' LIMIT 1";
        if ($wpdb->get_results($query)) {
            return do_shortcode($content);
        } else {
            return $notice;
        }
    }
    add_shortcode('reply', 'reply_to_read');
3 修改CSS样式
大家可以根据自己的需要修改上述代码extract语句中css自己定制化的css样式。
样式示例:
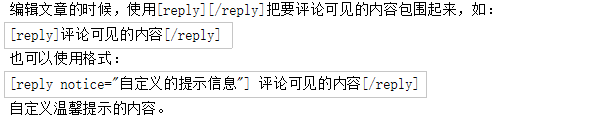
[reply]评论可见的内容[/reply]
4 使用方法
5 注意的点
如果站点在后台设置了评论审核,那么游客评论之后需要站点管理员审核评论通过之后刷新页面才会看到隐藏内容,所以如果要使用该功能建议关闭评论审核功能。
本文作者:StubbornHuang
版权声明:本文为站长原创文章,如果转载请注明原文链接!
原文标题:WordPress – 为文章增加评论才可查看相关隐藏内容的代码
原文链接:https://www.stubbornhuang.com/811/
发布于:2020年05月05日 19:19:34
修改于:2023年06月26日 22:25:01
声明:本站所有文章,如无特殊说明或标注,均为本站原创发布。任何个人或组织,在未征得本站同意时,禁止复制、盗用、采集、发布本站内容到任何网站、书籍等各类媒体平台。如若本站内容侵犯了原著者的合法权益,可联系我们进行处理。
文章末尾
评论
71